Wednesday, March 30, 2011

Healthy Blueberry Oatmeal Muffins Recipe

We've all heard the myriad ads and news stories admonishing the benefits of a heart-healthy lifestyle and the benefits of whole grains. But in a new study published in the Archives of Internal Medicine, their findings go a bit further with a bit more incentive to kick-start a healthier diet.

Their findings show that filling up on fiber, particularly whole grain fiber, may not only give you a higher quality of life but may reduce your risk of dying from heart disease. In fact, in this study, those who had the highest fiber intake were 22% less likely to die from any cause when compared to participants who ate the least amount of fiber. The highest protection in the study came from fiber-rich foods primarily from cereal fiber in grains as opposed to other fiber sources such as fruits and vegetables.

Below is a go to recipe my family loves. It satisfies mom with healthy fibers, whole wheat flour and oatmeal, a leading source for lowering LDL (bad cholesterol), and blueberries, and it satisfies my son with a very active sweet tooth. There is nothing like the pleasure of sending your loved ones out the door in the mornings armored with nutrient-rich protection from both whole grains and blueberries!

We all know that blueberries are a super food. But did you know that Native Americans gathered these delicious fruits to treat coughs? And did you know that North America continues to lead the world in producing blueberries, accounting for more than 90% of the world's supply?

Nutritionists rank blueberries highest of any fruit for antioxidants and that one cup delivers 14% of the recommended daily dose of fiber and nearly a quarter of the recommended daily intake of vitamin C.

Healthy Blueberry Oatmeal Muffins

1 1/3 cup whole wheat flour
3/4 cup Old Fashioned Oatmeal
1/3 cup brown sugar
2 teaspoons baking powder
1/4 teaspoon cinnamon
1/4 teaspoon salt
1 beaten egg
3/4 cup non fat milk
1/4 cup canola oil
1/4 cup finely chopped walnuts
1 1/4 cups blueberries (fresh or frozen)

Preheat oven to 400 degrees. Grease 12 muffin tins with non-stick spray or line with paper baking cups, set aside.

Combine dry ingredients. Make a well in the center of the mixture and set aside.

In another bowl, combine egg, milk and oil. Add this mixture to the well in the dry mixture, along with fresh (or thawed) berries. Stir until just moistened. Batter should be lumpy.

Spoon into prepared muffin cups. Bake for about 20 minutes or until golden. Serve warm.

Tuesday, March 29, 2011

World's Most Expensive Bowl of Chowder:

It all began with a bowl of clam chowder. Saturdays in the Randall house means two things: I will eat too much at some point and I will probably lead my family to the outdoors on some adventure. Why not combine the two I thought on a Saturday afternoon as I enjoyed the creamy goodness and satisfying chewyness of a great bowl of national brand chowder - the DYI (do it yourself) side of my personality began to emerge. Usually I fight this urge as it leads me to expensive and sometimes incomplete conclusions to projects began but inconveniently unfinished. But instead I allowed myself to indulge this impulse and wonder about how the ingredients are grown, harvested, put together in a pot and enjoyed in a bowl. I began to hatch a plan to build the perfect bowl of clam chowder out of ingredients I harvested and caught. I started with the harvested and caught part instead of actually making a plan based on a recipe. The recipe emerged later thanks to my wife Emily.

My first task was to procure the ingredients in the most adventerous way possible. I had heard about "razor clamming" my grandfather used to talk about visiting the beaches of Clatsop County Oregon to go clamming. He made "clam patties" that were legendary. I had heard stories of the clamming experience but really had no personal experience in the activity so I began to research the activity online and found out that the local clam season runs from late October - May on the beaches near our home in Portland, Or. This was ideal due to the fact that I was right in the middle of the season. So I researched further and found some important factors to consider in order to have a successful razor clam harvesting trip to the coast.

The first factor is the ocean tides. The lower the tide the more abundant and accessible the clam beds are on the beach. Clams usually colonize so there are usually several in the same area. both in the water and on the sand. The best clam beds are only accessible during low tides. For a local report on tides check out http://www.protides.com they have tide tables for the Oregon and Washington beaches. After consulting the tide tables I found a date on the calendar that had the lowest tide of the month and I set our date for clamming.

Prior to our trip I really needed to find out more specifics about the harvesting process including the hows, the whys, and the equipment I'd need. The state allows use of a shovel or a clam gun. I thought, "...hey, anything with 'gun' in the title is for me! I don't want to shovel anything that doesn't sound like an adventure." So I visited a local store and invested $19.99 in a metal clam gun which resembles a pipe with a handle on the top. It's a pretty simple tool and didn't take long for me to figure out how it would be used...I'll explain. The "gun" is really just a cylindrical shovel that is shoved into the sand with the sole purpose of extracting a submerged clam. So really a shovel in your garage could accomplish the same thing and save you $20 on your adventure. The next expense was a required state issued license to harvest the Pacific Razor Clam. So I purchased my annual permit for $7 ( a three day non-oregon resident license is $11.50 for shellfish). The most obvious expense is the gas to get there (which is why I call my recipe "the world's most expensive clam chowder"), but it's worth the investment.

Tuesday, March 22, 2011

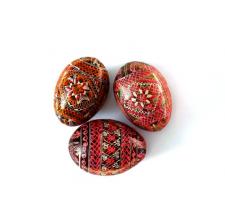
Pysanky; A New and Old Art Form for Easter

The art of Pysansky, better known as Ukrainian Easter Eggs, is ancient and filled with meaning and significance, practiced for hundreds and hundreds of years by Slavic women, and passed down through generations from mother to daughter.

It is an intricate art form feared to be dying. Earlier I blogged in more detail about the story behind these beautifully intricate eggs, including a brief history, meaning of the symbols and colors used, and of course, my own story regarding my connection to the Ukrainian Easter Egg. Visit my blog.

While decorating Easter Eggs in the traditional Ukrainian style requires specialized tools, it is possible to make them using ordinary household materials. Even egg dying kits have included wax crayons that can produce a similar result to these Ukrainian Eggs, incorporating the symbols and colors associated with such. Perfect for children and a great learning tool!

Pysanky eggs are simply made by applying wax to mask areas of the egg before it is dyed. Several layers of wax and colors of dye are used to create intricate, multicolor designs. To apply the wax, you may purchase a special stylus or make your own.

Things you will need:

Blown egg
Vinegar
Egg dye
Beeswax candle
Straight pin
Unsharpened pencil
Spoon
Paper towels


First, rinse the egg in vinegar and allow it to dry. Mix up several colors of egg dye according to the package directions. (Or make your own natural dyes from dried plants, roots, berries ... even onion skins, vegetables, etc). Light your beeswax candle and let it burn until there is a small pool of wax. Make a stylus by sticking a straight pin through the eraser of a pencil. You will use the head of the pin to apply the wax to the egg.

Secondly, dip the head of the pin in the pool of melted wax. Use the stylus to apply dots and lines of beeswax to your eggs, covering the areas you want to remain white. You may draw your design on the egg with a pencil before you start. Dye the egg in the lightest color, usually yellow. Since the egg has been blown, you will have to hold it down in the dye with a spoon. Remove the egg when the color is as dark as you would like. Allow it to dry on a rack or paper towels.

Next, use wax to cover the parts of the egg which you wish to remain yellow. Dye the egg in a second color and allow it to dry.

Then, add more wax to cover the colors you wish to remain the same. You may remove wax from areas you wish to color with another layer of dye by scraping it off gently. For example, if you covered an area you wish to dye blue in the first step, you can remove that wax after the yellow dye is used. Then when you immerse the egg in blue dye, the uncovered yellow area will become green while the uncovered white areas will be blue.

Finally, cover more of the egg with wax and dye the egg in darker dye colors. When the last color has dried, remove the wax with a warm wet cloth.

These instructions can be found at: http://www.ehow.com/how_6679313_make-pysanky-eggs.html.

:: If you make a version of these Ukrainian Eggs this Easter, we would love for you to send us a picture of your creation!

Happy Easter Egg Dying!